Natural light can completely transform your home, making spaces feel brighter, larger, and more inviting. That’s why many homeowners are choosing skylight installation as a smart upgrade for both comfort and energy efficiency.
But how exactly does the process work?
From planning and permits to sealing and final inspection, professional contractors follow a detailed process to ensure your skylight is safe, leak-proof, and long-lasting. In this guide by Roof Lux, we break down everything you need to know about the residential skylight installation process.
How Skylight Installation Works
A skylight installation involves selecting the right roof location, cutting an opening, installing structural framing, fitting the skylight, sealing it with flashing, and finishing with a leak test. Most projects take 1–2 days when handled by professionals.
Complete Skylight Installation Process
Step 1: Choosing the Ideal Location
The first step is identifying the best spot on your roof. Contractors typically install skylights between rafters to avoid major structural changes. Proper placement ensures maximum sunlight and energy efficiency.
Step 2: Obtaining Permits
Since skylight installation involves modifying your roof structure, permits are often required. Contractors handle approvals to ensure compliance with local building codes.
Did You Know?
A skylight installation can deliver a 60–80% return on investment (ROI) by improving home value and efficiency.
Step 3: Cutting the Roof Opening
Once approved, contractors carefully cut through the roof, including shingles, decking, and insulation. Precision is critical here to maintain structural integrity and avoid damage.
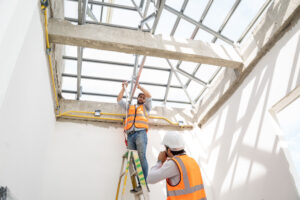
Step 4: Installing the Frame
To support the skylight, technicians install header beams and reinforce the opening. This ensures the skylight sits securely and evenly within the roof.
Step 5: Removing Roofing Material
Shingles or tiles around the opening are removed to create space for flashing. Typically, 6–12 inches of surrounding material is cleared.
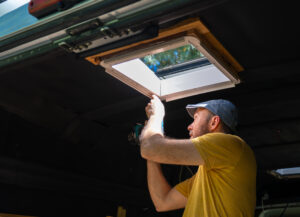
Step 6: Installing the Skylight Unit
The skylight is then placed into the opening and secured using fasteners. Proper alignment ensures durability and long-term performance.
Step 7: Flashing & Waterproofing
This is one of the most critical steps. Contractors install flashing layers and waterproof membranes to prevent leaks and protect against moisture damage.
Step 8: Sealing the Skylight
High-quality sealants are applied to secure all joints and edges. Roofing materials are then reinstalled around the skylight for a seamless finish.
Step 9: Interior Finishing
Inside your home, contractors repair drywall, insulation, and trim. The light shaft is painted and finished to match your interior design.
Step 10: Final Inspection & Leak Test
Finally, a water test is performed to ensure the skylight is completely leak-proof. Any issues are fixed before project completion.
Why Professional Skylight Installation Matters
Installing a skylight is not just about cutting a hole in your roof; it requires expertise in roofing, waterproofing, and structural support. Poor installation can lead to leaks, heat loss, and costly repairs.
Hiring professionals ensures:
- Proper sealing and waterproofing
- Compliance with building codes
- Long-lasting performance
- Increased home value
Conclusion
A residential skylight installation is a detailed, multi-step process that requires precision and expertise. From choosing the right location to final inspection, every step plays a crucial role in ensuring durability and performance.
When done right, a skylight not only enhances natural lighting but also improves energy efficiency and boosts your property’s value. With the right contractor, you can enjoy a brighter, more comfortable home for years to come.
FAQs
How long does a skylight installation take?
Most skylight installations take 1 to 2 days, depending on roof type and complexity.
Can skylights cause leaks?
Not if installed correctly. Proper flashing and sealing prevent leaks effectively.
What is the best type of skylight for homes?
Fixed skylights are affordable, while vented skylights provide additional ventilation.
Do skylights improve energy efficiency?
Yes, they reduce the need for artificial lighting and improve insulation when properly installed.
How often should skylights be maintained?
Annual inspections and regular cleaning help maintain performance and prevent issues.
What is the best type of skylight for residential roofs?
Fixed skylights are cost-effective, while vented skylights improve airflow and ventilation in kitchens and bathrooms.
Do skylights increase home value?
Yes, skylights can increase property value by improving natural lighting, energy efficiency, and overall home appeal.
Can skylights cause roof leaks?
Improper installation can lead to leaks, but professional flashing and sealing prevent water damage effectively.
Are skylights energy efficient?
Modern skylights with double glazing and UV protection help reduce energy costs by improving insulation.
How do I maintain a skylight after installation?
Regular cleaning, checking seals, and inspecting flashing annually helps maintain performance and prevent leaks.